Maya for 3D Printing - Rapid Prototyping
In this course we're going to look at something a little different, creating technically accurate 3D printed parts.
#
1
12-10-2010
, 07:44 PM
Registered User
Join Date: Sep 2006
Join Date: Sep 2006
Posts: 2
Seams on Nurbs
#
2
13-10-2010
, 04:04 AM
#
3
13-10-2010
, 10:01 PM
Registered User
Join Date: Sep 2006
Join Date: Sep 2006
Posts: 2
Thanks, I'll try that.Originally posted by hamidz90
im not really sure but i think if you set your nurbs tessellation higher it should fix it, you can do this by selecting your nurbs object.....going in the rendering section then click on the menu called Render and then on set nurbs tesselation
#
4
10-12-2010
, 09:01 AM
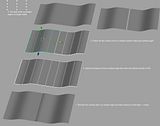
There are a number of ways to correct this. The easiest is to attach the two surfaces using the "blend" and 50% settings and then detach them. This will force the two surfaces to be tangent at the edges where they meet. Alternatively, you can select the two hulls that run parallel on both surfaces, closest to the seam, and make them all coplanar.
There are other solutions as well at some point I will make a small video tutorial to demonstrate in the mean time I will grab a couple screen shots to demonstrate the cause and one solution.
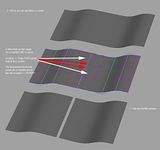
Here is the first image. It demonstrates what makes a seam invisible == crease less is TANGENCY.

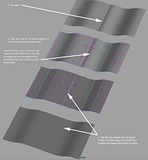
This next image shows how breaking TANGENCY also creates a seam...

And here is one solution (attach with blend and then detach)...

Just a final note. Once you have tangency at two edges then as long as you keep the four hulls closest to the edge (two on each surface) planar you can do anything you want to all the OTHER cv's and hulls and there will never be a visible seam.
"If I have seen further it is by standing on the shoulders of giants." Sir Isaac Newton, 1675
Last edited by ctbram; 10-12-2010 at 10:42 AM.
Posting Rules Forum Rules
Similar Threads
Free Friday Tutorial #7: Maya NURBS tips and tricks
by Nilla in forum SimplyMaya Tutorials replies 7 on 10-12-2011
Polygons v/s Nurbs
by Perfecto in forum Maya Basics & Newbie Lounge replies 10 on 22-07-2010
nurbs render problem
by crazycatz in forum Maya Modeling replies 6 on 12-12-2004
How do you join NURBS surfaces?
by mrdarklight in forum Maya Basics & Newbie Lounge replies 2 on 13-12-2003
Your Getting on my last NURBS!!! he he he
by SuperDave71 in forum Maya Basics & Newbie Lounge replies 3 on 30-10-2002
Topics
New tutorial - Create tileable textures from photos. Photoshop to Alchemist to Maya 2
By David
Site News & Announcements
3
Free Courses
Full Courses
VFX News
How computer animation was used 30 years ago to make a Roger Rabbit short
On 2022-07-18 14:30:13
Sneak peek at Houdini 19.5
On 2022-07-18 14:17:59
VFX Breakdown The Man Who Fell To Earth
On 2022-07-15 13:14:36
Resident Evil - Teaser Trailer
On 2022-05-13 13:52:25
New cloud modeling nodes for Bifrost
On 2022-05-02 20:24:13
MPC Showreel 2022
On 2022-04-13 16:02:13


