Maya 2020 fundamentals - modelling the real world
Get halfway through a model and find it's an unworkable mess? Can't add edge loops where you need them? Can't subdivide a mesh properly? If any of this sounds familiar check this course out.
# 1 17-08-2009 , 01:14 PM
Registered User
Join Date: Oct 2008
Posts: 58

spheres lofting problem

i'm trying to build this type of geometry

user added image

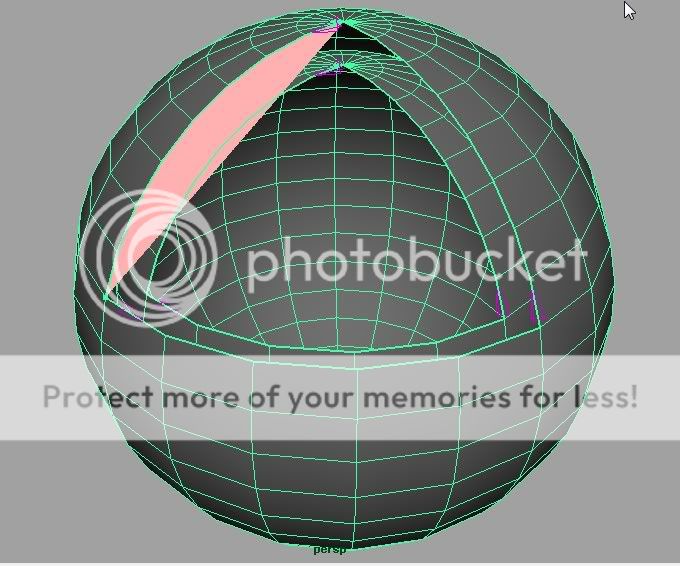
i created two polygon spheres, combined them and picked the edges of both (picture below). am i right so far or should i create nurbs in the first place? the thing is after i try to loft the selected edges a weird thing appears, even if i change the settings in the loft option box. any help?

user added image

# 2 17-08-2009 , 01:21 PM
mastone's Avatar
Maniacal boy king of Babylon
Join Date: Aug 2005
Location: the netherlands
Posts: 1,605
# 3 17-08-2009 , 02:50 PM
Registered User
Join Date: Oct 2008
Posts: 58
alright, tell me what to do then.

it's a newbie forum,what's the laugh for? :angery:

# 4 17-08-2009 , 03:09 PM
gster123's Avatar
Moderator
Join Date: May 2005
Location: Manchester Uk
Posts: 6,300
Combine the 2 spheres into one object, then I would use the append poly tool to add the faces between them.


"No pressure, no diamonds" Thomas Carlyle
# 5 17-08-2009 , 04:23 PM
Registered User
Join Date: Oct 2008
Posts: 58
i followed your instructions. the thing is what to do in the point i show you in the picture. the arrows follow the big sphere geometry and not the small one. i want to achieve the first picture. are you sure it's a polygon i'm after? is there a way to smooth it as if it was a nurb? (if i ever get the append...user added image )

user added image

# 6 17-08-2009 , 04:28 PM
mastone's Avatar
Maniacal boy king of Babylon
Join Date: Aug 2005
Location: the netherlands
Posts: 1,605
"it's a newbie forum,what's the laugh for?"

My sincere apologies user added image

I would start with a nurbs sphere and do an endsweep of like 270 degrees and rotate the sphere to an angle of your choosing, then convert to polygons because it's easier to edit geometry in poly mode, duplicate it and scal it down and then reverse the normal direction on the duplicated sphere(it's under normals in de polygons menu set)
what i usually do is use the append to polygon tool to connect the edges to one another.
rememver to press Y after each edge you connect otherwise it will keep going continuosly user added image

# 7 17-08-2009 , 04:37 PM
Registered User
Join Date: Oct 2008
Posts: 58
i did the reverse normals stuff. it only highlighted the small sphere in brown. are you sure of that? what's that tool for, really? user added image

# 8 17-08-2009 , 04:44 PM
Registered User
Join Date: Oct 2008
Posts: 58
and what about the append in the point i'm telling you in the picture? how can i jump from the big sphere to the small in the angle?

# 9 17-08-2009 , 05:16 PM
mastone's Avatar
Maniacal boy king of Babylon
Join Date: Aug 2005
Location: the netherlands
Posts: 1,605
I don't know the technical description but in short the normal direction affects the way poly's attach and/or interact with each other.
If you attach 2 poly's with different normal directions you get something i describe as funky stuff user added image

After you made sure the normals are pointing the correct way (see image)you"ll have to combine the two spheres then you can connect them by using the append to polygon tool select adjacent edges and connect them then press Y to repeat the last command and go to the next pair of edges

Attached Images
# 10 18-08-2009 , 09:29 AM
Chirone's Avatar
Subscriber
Join Date: Dec 2007
Location: NZ
Posts: 3,125
sifidis, this is something i've done quite a few times :p

in this situation where you have two pieces of polygons that have been combined together and you want to fill the hole and the fill hole command just doesn't do what you want it to do, you can do the append polygon way of filling in the hole

if you do, you need to add more points along that big giant edge with insert edge tool and then just snaps verts and merge them

a more detailed explanation...

it doesn't matter if you start with polygons or NURBS, but i started in polygons because you can just delete 1/4 of the sphere easy enough

1. turn off two sided lighting (in the view port panel it's Lighting > Two Sided Lighting), this will quickly let you know when your normals don't agree with each other (normals are the direction the face is facing) by showing one side black and the other in the material you've assigned
take you polygon sphere and kill the faces you don't want

2. duplicate and scale inwards or outwards. Take the inner sphere and reverse the normals (Normals > Reverse)

3. combine (Mesh > Combine)

4. select Edit Mesh > Append Polygon Tool

5. click on a vertex on one of the sphere and follow the direction of the arrows... at some point click on a vertex on the inner sphere

6. hit enter. be lazy and go Mesh > Fill Hole

and now the fun part...

either Mesh > Clean up (reset settings) and then delete all the unnessery edges along that birdged gap and turn everything along there in to quads

or

go Edit Mesh > Split Polygon Tool and connect the verticies between the inner and outer sphere to make quads

make stuff quads or it might render funny

Attached Thumbnails


that's a "Ch" pronounced as a "K"

Computer skills I should have:
Objective C, C#, Java, MEL. Python, C++, XML, JavaScript, XSLT, HTML, SQL, CSS, FXScript, Clips, SOAR, ActionScript, OpenGL, DirectX
Maya, XSI, Photoshop, AfterEffects, Motion, Illustrator, Flash, Swift3D

# 11 18-08-2009 , 11:25 AM
effacer's Avatar
Registered User
Join Date: Jan 2007
Location: Kathmandu, Nepal
Posts: 108
there is no loft for poly surfaces. however, its' really easy with poly and it's own tools.
after attaching the two spheres, reverse the normal direction of the inside sphere. then select the border edge of any one sphere (i've selected inner's) and extrude it to another's direction. now select all the vertices (i've selected the edges and converted the selection to vertices- i feel really comfy with this process). now merge the vertices. now u'll have to add loops around the edges that has to be sharp - i've inserted inside the newly created polys only, just to show u. i'm attaching the visual process too, just to make it more clearer.

Attached Thumbnails
# 12 18-08-2009 , 03:08 PM
NitroLiq's Avatar
Moderator
Join Date: Nov 2002
Location: New York
Posts: 2,133
You could also probably just create the one sphere, delete the faces for the hold, select the border edges and extrude inwards (locally). Then, just simply add a couple loops to sharpen the edges like effacer mentioned. Of course this only makes sense if you don't need a complete solid object inside the outer sphere. Maya really needs the equiv. of Max' shell modifier or Silo's "Shell" to quickly "thicken" objects.


"Terminat Bora Diem, Terminal Auctor opus."
# 13 19-08-2009 , 09:56 AM
effacer's Avatar
Registered User
Join Date: Jan 2007
Location: Kathmandu, Nepal
Posts: 108
thanks NitroLiq!! i forgot to mention that 'hollow inside' theory! .. really if there is no camshot that shows wht is inside then we might as well not model that area- this goes for any surface-inside or outside... this is just a waste of time for the modelers as well as texture artist, riggers, lighter .... i mean all the 3D artists..... but we have to keep in mind the reflection/refraction area/surfaces too..

# 14 20-08-2009 , 12:20 PM
NitroLiq's Avatar
Moderator
Join Date: Nov 2002
Location: New York
Posts: 2,133


"Terminat Bora Diem, Terminal Auctor opus."
Posting Rules Forum Rules
You may not post new threads | You may not post replies | You may not post attachments | You may not edit your posts | BB code is On | Smilies are On | [IMG] code is On | HTML code is Off

Similar Threads