Substance Painter
In this start to finish texturing project within Substance Painter we cover all the techniques you need to texture the robot character.
# 1 29-11-2013 , 07:12 PM
Registered User
Join Date: Jun 2013
Posts: 20

Rendering Mesh doesn't match original.

Hi there!

Its the first time I'm trying to export a render with the mesh on it.
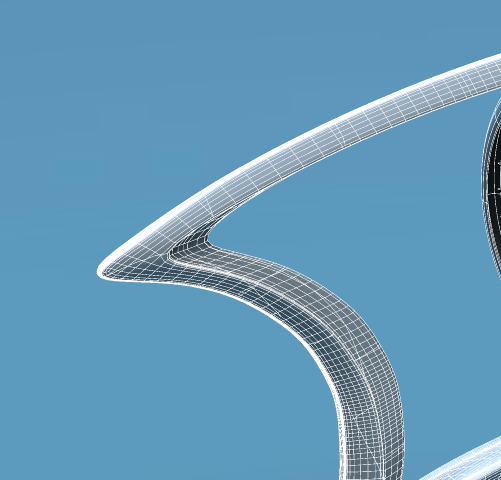
I got it working but the mesh lines are a lot closer together then in my viewport.
Also some stuff seems not to match and I'm getting triangles instead of all quad faces.

Here are my steps:

- Make new material (I made lambert)
- Went into the Mental ray section inside the Material group to enable Contour rendering.
- Applied the material to my object.
- Open render settings and went inside Mental ray section to enable Contour rendering
- Open the Draw By Property Difference Tab
- Select Around All Poly Faces
- Last step to make this work in my maya 2014 was to go into render settings -> Quality -> Sampling -> set unified sampling to Legacy Sampling mode or else Contour rendering won't work.

Those are my steps but I get very different results by doing this then the mesh in my viewport which looks a lot cleaner

- Viewport -
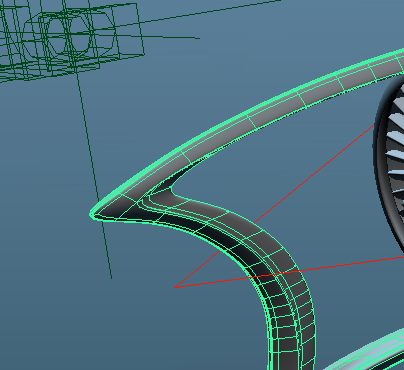
user added image

- Export -
user added image

Thanks for the user added image

# 2 29-11-2013 , 07:35 PM
tweetytunes's Avatar
Subscriber
Join Date: Jan 2004
Location: Bolton - UK
Posts: 2,457
Ok your not exporting anything your rendering with wireframe, lets just get that corrected first as it will just confuse people.

The steps you have taken to render the wireframe is correct.

It comes down to your model. What is it made off, poly sub-d or nurbs - looking at it i would say its poly with smooth preview on (pressed 3 on keyboard). If that is the case the render is correct as the smooth preview does not show you all the faces by default. Select object and press "1" and try a render to see if that correct the problem.


There are ways to change that but i dont know them. If its nurbs or sub-d's cant help you as I never use them.


# 3 30-11-2013 , 11:31 AM
Registered User
Join Date: Jun 2013
Posts: 20
Sorry for the exporting part I come from the video world and I'm just stepping into the 3D world user added image
Yes these are Polygons but still if I unsmooth them (pressing nr1) I still get something different then in the original viewport. user added image

# 4 30-11-2013 , 01:04 PM
tweetytunes's Avatar
Subscriber
Join Date: Jan 2004
Location: Bolton - UK
Posts: 2,457
I really dont know what is causing that then. Double check the normals are facing the right way, check if you have 2 faces sat ob top of each other and also check you dont have any un-needed verts along the eges if the faces. I would say its a mesh problem now. Feel free to upload the file and i wil have a look if you want


# 5 30-11-2013 , 03:33 PM
ctbram's Avatar
Moderator
Join Date: Jan 2004
Location: Michigan, USA
Posts: 2,998
Just a stab in the dark. Try selecting the object and then mesh>clean check all the boxes for non-manifold, laminar faces, faces with zero area and edges with zero length.

Also goto vert mode and select the entire model and be sure you do not have any floating verts

If that fails, if you don't mind sharing the model, compress it in a zip file and upload it and I will be happy to take a look at it to see whats causing the additional geo.


"If I have seen further it is by standing on the shoulders of giants." Sir Isaac Newton, 1675

Last edited by ctbram; 30-11-2013 at 05:04 PM.
# 6 05-12-2013 , 10:47 PM
Registered User
Join Date: Jun 2013
Posts: 20
Thanks for the help.
I've upload my file here.
Hopefully you can find out whats wrong user added image

# 7 06-12-2013 , 02:32 AM
ctbram's Avatar
Moderator
Join Date: Jan 2004
Location: Michigan, USA
Posts: 2,998
Well I looked at it and I can't figure out for the life of me what you have managed to do.

I checked the geo, I deleted history, I cleaned zombie nodes, I exported to obj and back in again.

It smooth previews fine, I can explicitly smooth it and in the gui it looked fine but when you render with contour rendering on it gets a bunch of extra edges and I have no clue why.


Also you modeled the entire thing rotated off axis so it was an extra pain when I tried to cut the model in half and then mirror it to see if I could clean it up. As far as I can tell the geo looks valid but there has to be something that is not showing up when I look at the hypergraph that is messing up the contour render.

I'd wait and see if anyone can figure it out and if not it might be faster to get things back to proper axis alignment, delete that part and remodel it CAREFULLY.


"If I have seen further it is by standing on the shoulders of giants." Sir Isaac Newton, 1675

Last edited by ctbram; 06-12-2013 at 02:47 AM.
# 8 06-12-2013 , 12:27 PM
Registered User
Join Date: Mar 2007
Posts: 1,055
Hi,

disable "enable UV contour rendering" as per the image and I think it renders as you'd expect,

cheers,

gubar

Attached Thumbnails
# 9 06-12-2013 , 12:46 PM
tweetytunes's Avatar
Subscriber
Join Date: Jan 2004
Location: Bolton - UK
Posts: 2,457
yep he is right disabling "enable UV contour rendering" in your scene does the trick, but on my own stuff it makes no difference.

Glad someone was able to sort it for you


# 10 06-12-2013 , 01:25 PM
ctbram's Avatar
Moderator
Join Date: Jan 2004
Location: Michigan, USA
Posts: 2,998
yep I just confirmed it. It's odd I have never run into this before I contour render quite a bit and I checked both maya 2013 and 2014 the option to enable uv contour render is on by default. Glad you figured it out G. I will add that to my Maya odd issues file so i'll know what to check if I should ever see it.

Attached Thumbnails

"If I have seen further it is by standing on the shoulders of giants." Sir Isaac Newton, 1675
# 11 06-12-2013 , 01:32 PM
Registered User
Join Date: Jun 2013
Posts: 20
Yes that seemed to fix my problem,
Maybe it was because I went from Nurbs and converted them to Poly later?

But now my nurbs have no meshes.
Anyway to fix that?


Last edited by Stylow; 06-12-2013 at 01:38 PM.
# 12 06-12-2013 , 01:32 PM
Registered User
Join Date: Mar 2007
Posts: 1,055
It's been ages since I rendered anything in maya, but I have rendered contours for wireframes in the past and never run across this issue.

Maybe it's a new feature, I only really use maya for modelling and UVing these days.

Glad it's sorted,

cheers

gubar

# 13 06-12-2013 , 01:34 PM
Registered User
Join Date: Mar 2007
Posts: 1,055

Yes that seemed to fix my problem,
But now my nurbs have no meshes.
Anyway to fix that?

Perhaps the contour render/UV setting is providing the wireframe on the nurbs based on their UVs. In which case you could either convert them to polygons, or render and composite two seperate passes.

Posting Rules Forum Rules
You may not post new threads | You may not post replies | You may not post attachments | You may not edit your posts | BB code is On | Smilies are On | [IMG] code is On | HTML code is Off

Similar Threads