Digital humans the art of the digital double
Ever wanted to know how digital doubles are created in the movie industry? This course will give you an insight into how it's done.
# 16 15-11-2011 , 01:47 PM
SilverFeather's Avatar
Noober than noob
Join Date: Sep 2011
Posts: 520

Thanks mate, they are seperate meshes thats why it looks funny...thats where I stopped short of sewingmeshes together. I think its FAR from good though...it takes LOTS of practice and I havent practiced at all...but I will

Definitely better than what I'd make if I'd try it that way.

With cube modeling I can create everything out of just 1 cube, no sewing (i fail at sewing anyway) and I can use the Interactive Split Tool to make everything out of it (eye socket shape, nostril shape, ears, arms, legs, fingers, toes, eyebrows, mouth). It probably would have come out better if I had solved that mirror problem I had with the square edge forming upon smoothing. (failed to use mirroring at the Helmet tutorial).

I think I've got an idea on how to fix the edge part next time, but would probably involve creating hexagons in the areas that should be rounder (neck, hands, arms, legs and parts of the face).

Last edited by SilverFeather; 15-11-2011 at 01:50 PM.
# 17 15-11-2011 , 06:11 PM
Registered User
Join Date: Aug 2011
Location: Sliema Malta
Posts: 497
A advantage of going at it simple is also you can delve into the realm of UVing and texturing on these objects. The biggest advantage you can give yourself to improve the overall quality of your film is the ability to have a solid workflow. Having proper topology and UVmaps will lead to endless possibilities as far as quality. It can still be basic but done correctly from the beginning. I might be a advocate of retopology and most here model from Maya unlike myself. But one thing is for sure and that is all of the "seasoned" users around here will preach the necessity of proper topology with the fewest polys and the best edgeflow. So I recommend you read up on Jay's thread of topology and have a look at models around here that look similar to his advice. My first detailed models were spoons and chess pieces. After I was comfortable creating those things I moved up to power tools and whatnot. Take slow calculated steps so you don't end up jumping off the cliff without even knowing it.

Btw a 20 min film by yourself is quite EPIC

# 18 15-11-2011 , 06:33 PM
EduSciVis-er
Join Date: Dec 2005
Location: Toronto
Posts: 3,374
Another word of advice... a 20 min animation is massive, it really is. And because it sounds like you're feeling pressed for time, you're trying to make sure all your learning actually is a useful asset for your animation. I think this way you're going to drive yourself crazy. Take the time to do some tutorials (Jay's alien tut would be great for learning some of the stuff you're struggling with), practice on some smaller pieces, and work yourself up towards your big project. You will not be able to do what you want without first learning mirroring, sewing, etc.

# 19 15-11-2011 , 06:50 PM
SilverFeather's Avatar
Noober than noob
Join Date: Sep 2011
Posts: 520

A advantage of going at it simple is also you can delve into the realm of UVing and texturing on these objects. The biggest advantage you can give yourself to improve the overall quality of your film is the ability to have a solid workflow. Having proper topology and UVmaps will lead to endless possibilities as far as quality. It can still be basic but done correctly from the beginning. I might be a advocate of retopology and most here model from Maya unlike myself. But one thing is for sure and that is all of the "seasoned" users around here will preach the necessity of proper topology with the fewest polys and the best edgeflow. So I recommend you read up on Jay's thread of topology and have a look at models around here that look similar to his advice. My first detailed models were spoons and chess pieces. After I was comfortable creating those things I moved up to power tools and whatnot. Take slow calculated steps so you don't end up jumping off the cliff without even knowing it.

Btw a 20 min film by yourself is quite EPIC

I am limited when it comes to available technology. Here is what I will be using for everything: a pc with 3Ghz CPU dual core, 4 GB Ram (pretty sure not all of it is available, but at least 3 GB) and 1 GB graphics card (ATI Radeon HD5500) and I've heard that graphics card barely does anything when it comes to rendering. Wish I had a render farm, but none of the other computers available are strong enough to put up with the stuff in Maya, much less network rendering.
I did take a look in the Topology thread here, but almost all are made by edge extruding, not poly extrude like I use.
What I'll have to find or figure out is a map of lines to draw. I have also noticed that some users didn't get rid of the line in the middle of the mesh after merging the mirrored half with the first half. I still have to figure out how to get rid of that.

I know, it doesn't sound like it will be easy to do the whole video part by myself and with models all made from scratch, but that's the aim. I'll have to make cities and other landscapes + parts of the galaxy from scratch as well. (textures might be taken from off the internet if they are free or my friends could make them since they are good at it). I will be doing the modeling and my friends will provide the voice acting and probably music (though i also compose music with synths).
Basically, the movie involves space traveling (a bit, it's not all about spaceships and such though a flying saucer will mostly be there) and moving from one planet to the other. It will also feature some racing scenes so I'll have to practice making vehicles too.

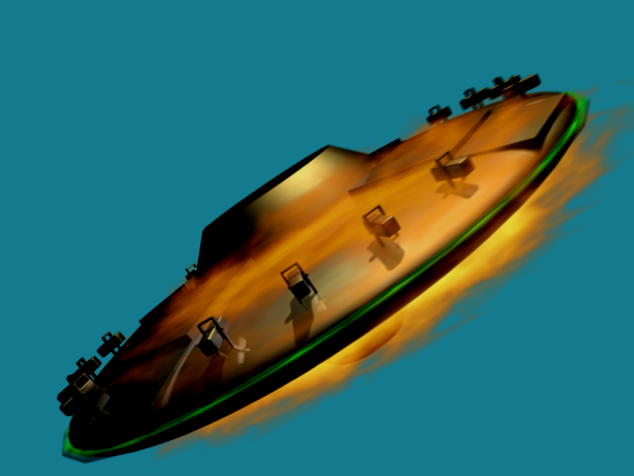
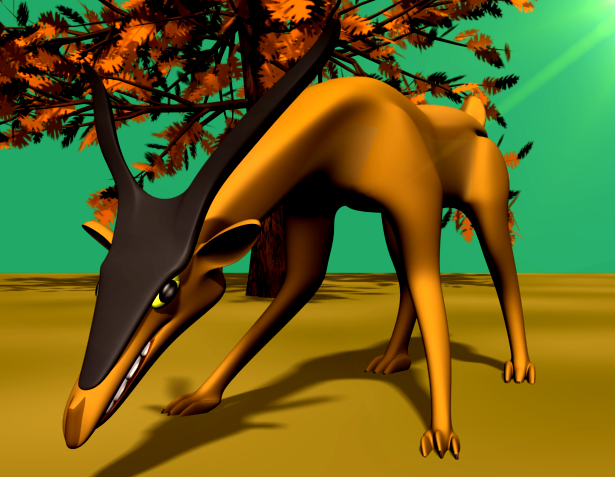
I have made some 3ds max attempts long ago to make the flying saucer and an alien creature, but I didn't like the way they turned out. I hope that when I'll remake them on Maya I can add more details to them.
user added image
user added image

Another word of advice... a 20 min animation is massive, it really is. And because it sounds like you're feeling pressed for time, you're trying to make sure all your learning actually is a useful asset for your animation. I think this way you're going to drive yourself crazy. Take the time to do some tutorials (Jay's alien tut would be great for learning some of the stuff you're struggling with), practice on some smaller pieces, and work yourself up towards your big project. You will not be able to do what you want without first learning mirroring, sewing, etc.

I need a precise list of what I will be needing for this animation, something that I'm trying to build. If I'll walk through the whole tutorial and then find out that there's an easier or better way to do stuff than that, it would mean that I have wasted time.
So far I'll surely need to learn to model as round as possible, mirror, assign hair/fur and UV mapping, make particles and figure a way to use nCloth without the errors (nowhere in the tutorial does it say that I am not allowed to set the same object as a collider object for more than 1 Nucleus, but seems that it is impossible to do that).
I might try mirroring again, but I hope I won't run into the same problem.
I also feel at times like Maya's rendering is not as fast as 3ds max's. I have rendered a whole city of skyscrapers with 100% reflective surfaces in under an hour on it. If I'd have to re-create that on Maya, it would probably take ages.

The mirror geometry problem seems to have been fixed for smoothed meshes, I guess it had something to do with the settings of the smoothing that I had back when I first tried to mirror a face. Well, I'll re-try now to see what I can do now.


Last edited by SilverFeather; 15-11-2011 at 07:23 PM.
# 20 15-11-2011 , 09:18 PM
SilverFeather's Avatar
Noober than noob
Join Date: Sep 2011
Posts: 520
So, is this a good start or a bad start? A problem arises: Edge loop can no longer insert edges over the whole mesh. Now I'm stuck with using either interactive split tool or cut faces. What did I do wrong now?
It's the same problem as this one: https://simplymaya.com/forum/showthre...threadid=33498
And interactive split also has some trouble. It won't split certain faces.
The second pic shows the problem of edge loop, the line will not go over the bottom facet.

Attached Images

Last edited by SilverFeather; 15-11-2011 at 09:27 PM.
# 21 15-11-2011 , 09:29 PM
EduSciVis-er
Join Date: Dec 2005
Location: Toronto
Posts: 3,374
Insert edge loop won't go through a non-quad. Check that there aren't any stray vertices or anything in that bottom face.

# 22 15-11-2011 , 09:38 PM
SilverFeather's Avatar
Noober than noob
Join Date: Sep 2011
Posts: 520

Insert edge loop won't go through a non-quad. Check that there aren't any stray vertices or anything in that bottom face.

You're right, there were 2 vertices - one in the back and one in front that i couldn't see. I need to change the mesh color to see them better. Thank you.

Apparently there's yet another problem:
The following faces are non-quad. What do I do to fix this? The non-selected faces are exactly where I need to insert the new loops. There are no more stray vertices.

Attached Images

Last edited by SilverFeather; 15-11-2011 at 10:05 PM.
# 23 15-11-2011 , 10:27 PM
EduSciVis-er
Join Date: Dec 2005
Location: Toronto
Posts: 3,374
Just want to back up a bit here...

If I'll walk through the whole tutorial and then find out that there's an easier or better way to do stuff than that, it would mean that I have wasted time.

I don't really understand your logic here, tutorials are designed to give you better ways of doing things. To teach the tools and show you how to avoid common pitfalls. Yes, if it's a crappy tutorial, it might be a waste of time, but most tuts will get you further ahead faster than figuring it out on your own. Case in point, watch an industry professional show you some of the most efficient ways to build up topology, in the surfing with the alien tutorial. My review of it is here https://biocinematics.blogspot.com/20...en-review.html so you can decide for yourself if it is worth your money.

To answer your question here, I think it would be just as fast to use the split poly tool, no harm in doing that.

# 24 15-11-2011 , 10:36 PM
SilverFeather's Avatar
Noober than noob
Join Date: Sep 2011
Posts: 520

Just want to back up a bit here...


I don't really understand your logic here, tutorials are designed to give you better ways of doing things. To teach the tools and show you how to avoid common pitfalls. Yes, if it's a crappy tutorial, it might be a waste of time, but most tuts will get you further ahead faster than figuring it out on your own. Case in point, watch an industry professional show you some of the most efficient ways to build up topology, in the surfing with the alien tutorial. My review of it is here https://biocinematics.blogspot.com/20...en-review.html so you can decide for yourself if it is worth your money.

To answer your question here, I think it would be just as fast to use the split poly tool, no harm in doing that.

I wasn't refering to the "Surfing with the alien" tutorial. I don't even have money so I'll have to deal with finding an online tutorial. The tutorial I was refering to as a possible waste of time is this: https://download.autodesk.com/us/maya...ted/index.html
Do I really have to do all that it says in the Maya tut. just to model a human character?

In that case I'll probably have to go my own way in the end, but that also means I'll need feedback as to what has to be fixed since nobody can say "It's ok" or "It's bad" except who knows more than me in this domain.

I've kept seeing the Split Poly mentioned, but in Edit Mesh I only see Interactive Split, which gives me a lot of trouble. (line doesn't appear or won't connect edges sometimes). The software is Maya 2012.
Scratch that, seems like the magnet tolerance was too high.


Last edited by SilverFeather; 15-11-2011 at 10:55 PM.
# 25 15-11-2011 , 11:02 PM
SilverFeather's Avatar
Noober than noob
Join Date: Sep 2011
Posts: 520
I've restarted the work and made sure that this time the edge loop works. Is this good enough for a start?
I probably messed up at the eye part though.

I have no idea how to make the eyelids.
Seems I am in need of a "Complete idiot's guide to box modeling". Everyone else makes models with continuous edges, mine ended up having eye edges that are not continued over the whole mesh.

Attached Images

Last edited by SilverFeather; 16-11-2011 at 04:33 PM.
# 26 03-01-2013 , 11:10 AM
Registered User
Join Date: Jan 2013
Posts: 5
Hey man, here are some examples of professional face and body modelling in Maya:
https://www.sharecg.com/images/medium/2150.jpg
https://2.s3.envato.com/files/1179109...an_preview.jpg

It is very important for the edge loops to 'flow' through the character. Nothing should be jaggy and non-uniform. Efficient edge loops are extremely important when it comes time to animate your character, because you want to best deformations possible out of your character mesh.
Ngons (five or more sided polygons) are a massive NO for any model. No polygon should have more than 4 edges. Try your best to rectify these problems by inserting edges (shift right-click interactive split tool) to existing polygons to break them up into quads.
Hope this helps

# 27 04-01-2013 , 12:52 AM
Jay's Avatar
Lead Modeler - Framestore
Join Date: Feb 2003
Location: UK
Posts: 6,287
I think you do seriously need to go back and start again. Theres clearly a 'want' to do a character from start to finish, but as has been mentioned already, you are doing too much too soon.

Also have a look at our own thread created to help you on the subject of topology, alot of people miss it and its right here in the WiP forum https://simplymaya.com/forum/showthread.php?t=24483 Collin has mentioned this already to you.

If you are going to look at a tutorial to help guide you along, then follow it, then find another where someone else uses a different technique, then follow it. You can then decide what approaches to take, that suit you as an artist. Theory and practice go hand in hand, how can you expect to model something right if you dont know the fundamental 'rules' of modelling.

Seriously, start again, go slower study the meshes in the topo thread above. Look at the does and donts and look at the muscle ref posted in there too, those things are there to guide people become better modellers, not just to have a look and then guess the rest. Keep your meshes fairly low to begin, fine tune it as far as it will go and then add geo and do the same again. Dont just make a low res model assume its done then hit the subdivide button, its really not the way to go.

As Ikarugos said, edge flow is so important when creating characters of this nature.


As you arent buying any of our tutorials here, I will point you here to 3dTotal https://www.3dtotal.com/index_tutoria...2#.UOYmKG8j5Bk

They loved our Chef Ramsay and they asked for a short written version of it which we did. It wont show you every last detail of how I did it, but it put you in the right direction to building a better character. READ IT FIRST before you start. you are clearly having some troubles with your model so a bit of theory wont kill you to take on board.

Please dont feel you are being put down, but I feel you just need to be told straight.

Remember do some theory first.


Jay

# 28 07-01-2013 , 12:10 AM
SilverFeather's Avatar
Noober than noob
Join Date: Sep 2011
Posts: 520
I already did restart that character long ago. https://simplymaya.com/forum/showthre...t=36746&page=9

Then I was told to change the edge loops so that it will have the correct topology (or something like that, it's been a while since I've been here) so I've decided to follow the arrangement on someone's pic to see if I can get mine to have the same kind of edges (the interactive split tool is useful there).
Still, I do not know how to make the nose (I had it done and then deleted it as I was told I need to re-do it).

The Chef Ramsay one looks easier to start (unlike the method I've used to start mine) and I have used the method shown in Chef Ramsay picture for modeling the ears after Miss Nova showed me the pictures on how to make them. Though I do not know if I should re-start once again or if I can just correct the edge loops on current head and get back on track. Some of the lines have been deleted. They used to be all quads until I've started changing the loops.
user added image
The picture I am following the edge loop arrangement of was in the topology thread but I can't find it anymore. But I do not know if it is a good or bad idea to follow a picture's edge loops, as I see a lot of different arrangements for them, yours seems simpler to make.

I thought nothing could make me back down... until the whole team that was supposed to help with the project just scattered. Can't blame them though, I had work (and all I've gained had to be spent on expenses for the whole family, what with December and all), they had work, the friend that used to make the storyboards had to cut contact because of personal reasons of his... Probably going to keep happening since it's a zero budget project. Now that was what made me take a huge break from this, totally discouraged me too. I feel like I've left them down since I'm taking ages to just get started.

The only thing I did in Maya lately was some minor modeling, such as this critter, but way too simple and probably not following any rules, but it was mainly for a picture, not animation.
user added image
user added image

I just wish I could get my will back and either pick up where I left or start over once again and hopefully be on the right track.

# 29 07-01-2013 , 11:02 PM
Nilla's Avatar
Administrator
Join Date: Jun 2009
Location: Prague
Posts: 827
Hey there, critter looks really nice to me. And don't give up on your project or feel like you let people down what you're going for is massive so it's not going to happen overnight take it as a bump along the road and bounce back user added image Don't know if you ever came across this film https://thechaseshortfilm.com/ but I'm sure everyone told that guy he was mad as well.

Since you feel a bit discouraged for now how about figure drawing? You could practice pose and proportion, it's more rewarding than trying to do the whole 3D thing on your own straight off the bat. If you study staging and storytelling you can move on to doing your own boards and animation when you get to that point with the film project as well.

Here's some refs I like;
https://www.elfwood.com/farp/figure/w...struction.html
https://johnkcurriculum.blogspot.cz/2...rinciples.html
https://www.alienthink.com/
https://www.youtube.com/user/markcrilley
https://www.idrawdigital.com/2009/01/...nd-proportion/

# 30 07-01-2013 , 11:18 PM
Gen's Avatar
Super Moderator
Join Date: Dec 2006
Location: South FL
Posts: 3,522
Was there some kind of short file in the works? That's a monumental task especially if you're trying to get your bearing in organics. I'm on Jay's Surfing Alien tut and I've churned out about 4 lumpy headed abominations and counting lol but but I've learned a lot (like I was overthinking some aspects and panicking, thus the lumps) plus it probably doesn't help that I'm going back and forth between projects. I say start small and stick with it.


- Genny
__________________
::|| My CG Blog ||::
::|| My Maya FAQ ||::
Posting Rules Forum Rules
You may not post new threads | You may not post replies | You may not post attachments | You may not edit your posts | BB code is On | Smilies are On | [IMG] code is On | HTML code is Off

Similar Threads