Maya for 3D Printing - Rapid Prototyping
In this course we're going to look at something a little different, creating technically accurate 3D printed parts.
#
1
01-02-2012
, 08:55 AM
Render AO to texture
cheers bullet
P.S I will keep trying LOL...I dont go idle
bullet1968
"A Darkness at Sethanon", a book I aspire to model some of the charcters and scenes
#
2
01-02-2012
, 09:02 AM

2 x Modeling Challenge Winner
#
3
01-02-2012
, 09:29 AM
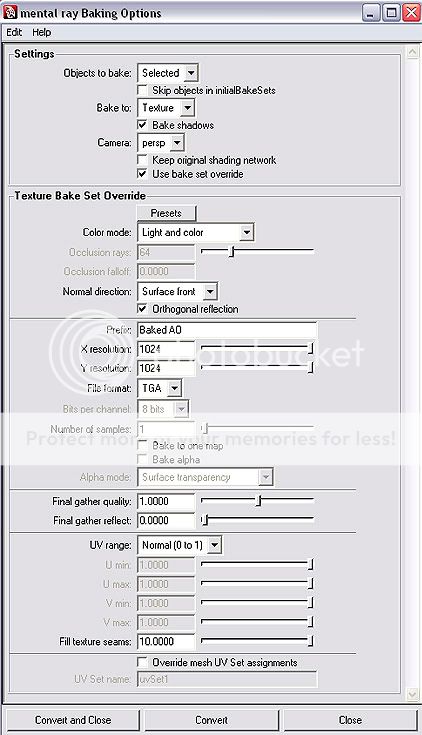
assign a new material (lambert)
create a texture bake set
rendering > lighting/shading > assign new bake set > texture bake set
have a look at the attributes for the texture bake set. at the top you can change light and colour to occlusion. before you increase the settings see if that works.
go to same menu batch bake mental ray
#
4
01-02-2012
, 09:33 AM
cheers dom, I did that but it baked in like 0.2 secs...and I couldnt find the file....I must have missed something out LOL.
cheers bullet
bullet1968
"A Darkness at Sethanon", a book I aspire to model some of the charcters and scenes
#
5
01-02-2012
, 09:36 AM
yes once you have the file combined in PS you can apply it to the material like any other texture file.I assumed I then just aplly that combined as one texture file?

2 x Modeling Challenge Winner
#
6
01-02-2012
, 10:21 AM
cheers bullet
bullet1968
"A Darkness at Sethanon", a book I aspire to model some of the charcters and scenes
#
7
01-02-2012
, 10:37 AM
First make sure you have specified a project folder. To do this select File> Project > Set, and select a file. This file is where your baked texture will automatically be saved. If you forget to set a project folder the bake will be saved in your default projects file in your My Documents folder.
- Make sure that you have UV mapped your model.
- Make sure you check the face normals of your model are facing the right way or the bake will produce a black picture
- Make sure you have softened the edges of your model and created hard edges where needed
- Save a copy of your scene at this stage as Maya can crash while baking to texture
- Now choose the rendering menu set and select Lighting/Shading > Batch Bake (Mental Ray) > Options box

make sure you set the x and y res to the same size as your objects color texture file
- Select your object in the viewport and hit the 'Convert and Close' button to start baking the occlusion. When you do this Maya will not respond to any clicking, sometimes the screen will go blank and it generally looks like it has crashed but don't worry it will come back eventually. This can take anywhere from a few minutes to a few hours depending on how complex the scene is.
- Once the bake is completed open the project file that you specified earlier.
- In that folder select RenderData > MentalRay > Lightmap > select your baked texture file and open this with Photoshop.
- Drag the Occlusion bake on top of your model's color texture layer(s)(not the UV snapshot) and select Multiply as the layer blending mode. You may also want to apply a slight Gaussian blur to your occlusion layer, especially if it being used on an organic surface.
Finally save the composite file then go to Maya and create a material, open the attribute editor and in the color attribute map a file node and then add your composite image. Add the material to the object.

2 x Modeling Challenge Winner
Last edited by jsprogg; 01-02-2012 at 10:43 AM.
#
8
01-02-2012
, 10:40 AM

Avatar Challenge Winner 2010
#
9
01-02-2012
, 10:42 AM
cheers bullet
bullet1968
"A Darkness at Sethanon", a book I aspire to model some of the charcters and scenes
Posting Rules Forum Rules
Similar Threads
Baked texture different than the render view
by ibax in forum Maya Materials & Textures replies 6 on 22-01-2013
Is it possible to render fur in a render layer?
by tvholicjames in forum Maya Basics & Newbie Lounge replies 1 on 17-06-2008
Render Texture Problem
by hidekiw in forum Maya Basics & Newbie Lounge replies 4 on 04-05-2008
texture upside down when I render
by slickrenderer in forum Maya Basics & Newbie Lounge replies 4 on 03-11-2003
hardware render no texture
by Abdul Rehman in forum Lighting & Rendering replies 1 on 09-09-2002
Topics
New tutorial - Create tileable textures from photos. Photoshop to Alchemist to Maya 2
By David
Site News & Announcements
5
Free Courses
Full Courses
VFX News
How computer animation was used 30 years ago to make a Roger Rabbit short
On 2022-07-18 14:30:13
Sneak peek at Houdini 19.5
On 2022-07-18 14:17:59
VFX Breakdown The Man Who Fell To Earth
On 2022-07-15 13:14:36
Resident Evil - Teaser Trailer
On 2022-05-13 13:52:25
New cloud modeling nodes for Bifrost
On 2022-05-02 20:24:13
MPC Showreel 2022
On 2022-04-13 16:02:13


